English | 日本語 | Español (Latinoamérica)
MapConductor React SDK の CesiumJS プロバイダです。MapConductor のプロバイダ非依存なカメラ・マーカー・オーバーレイ API を通じて Cesium の 3D 地球儀を描画するため、同じアプリケーションコードが Google Maps、MapLibre、Mapbox、Leaflet、OpenLayers、ArcGIS、HERE でもそのまま動作します。
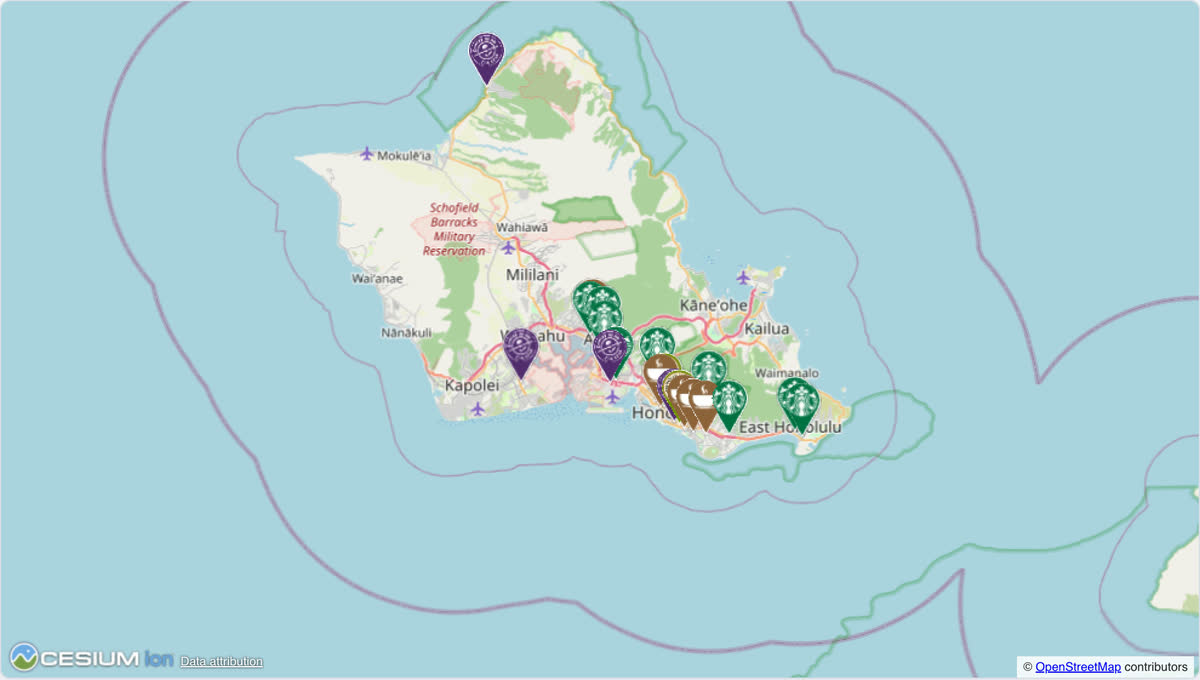
ライブデモで動かせます。同じ店舗マップがどのプロバイダでも動き、画面上で切り替えられます。店舗を 3 つに絞ったコード:
import { useMemo, useState } from 'react';
import {
  createGeoPoint,
  createMapCameraPosition,
  createMarkerState,
  type MarkerState,
} from '@mapconductor/js-sdk-core';
import { InfoBubble, Markers } from '@mapconductor/js-sdk-react';
import { CesiumDesign, CesiumMapView, useCesiumMapViewState } from '@mapconductor/react-for-cesium';
import '@mapconductor/react-for-cesium/style.css';

const STORES = [
  { id: 'waikiki', name: 'Waikiki', latitude: 21.2793, longitude: -157.8292 },
  { id: 'kailua', name: 'Kailua', latitude: 21.3972, longitude: -157.7394 },
  { id: 'haleiwa', name: 'Haleiwa', latitude: 21.5928, longitude: -158.1034 },
];

const INITIAL_CAMERA = createMapCameraPosition({
  position: createGeoPoint({ latitude: 21.38, longitude: -157.93 }),
  zoom: 10,
});

export default function App() {
  const mapViewState = useCesiumMapViewState({
    mapDesignType: CesiumDesign.Default,
    cameraPosition: INITIAL_CAMERA,
  });
  const [selected, setSelected] = useState<MarkerState | null>(null);
  const markers = useMemo(
    () =>
      STORES.map(store =>
        createMarkerState({
          id: store.id,
          position: createGeoPoint({ latitude: store.latitude, longitude: store.longitude }),
          extra: store,
          onClick: marker => setSelected(marker),
        }),
      ),
    [],
  );

  return (
    <div style={{ width: '100%', height: '100vh' }}>
      <CesiumMapView state={mapViewState} onMapClick={() => setSelected(null)}>
        <Markers states={markers} />
        {selected && (
          <InfoBubble marker={selected}>
            <strong>{(selected.extra as (typeof STORES)[number]).name}</strong>
          </InfoBubble>
        )}
      </CesiumMapView>
    </div>
  );
}npm install @mapconductor/react-for-cesium@mapconductor/js-sdk-core と @mapconductor/js-sdk-react(マーカーなどの共有コンポーネントで使用)は依存関係として自動的にインストールされます。ただしアプリケーションコードはこの2つから直接 import するため、pnpm の strict(isolated)な node_modules を使う場合や、import するものをすべて明示的に宣言したい場合は、次のように明示的にインストールしてください:
npm install @mapconductor/react-for-cesium @mapconductor/js-sdk-core @mapconductor/js-sdk-reactcesium は依存関係として同梱されています。Default デザインは Ion トークンなしで動作します。
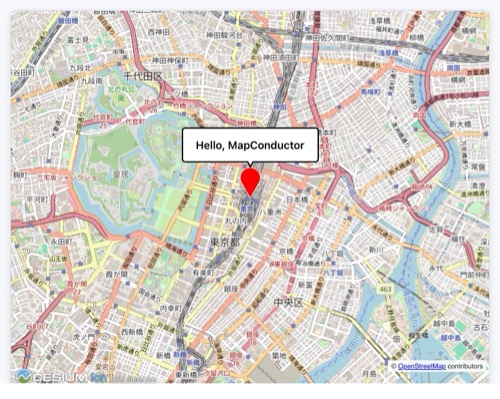
MapConductor + Cesium で作る、いちばん簡単な地図アプリです。マーカーをクリックすると「Hello, MapConductor」の吹き出しが出ます。この地図は、次の 5 ステップで作れます。Default デザインは Cesium Ion トークン不要で動作するので、コピペで動きます。
Vite で React + TypeScript のプロジェクトを作成します。
npm create vite@latest hello-map -- --template react-ts
cd hello-map
npm install
npm run dev地図表示に必要なパッケージを入れます。ここでは Cesium を使いますが、他の地図モジュールを使うこともできます。
npm install @mapconductor/react-for-cesium@mapconductor/react-for-cesium— Cesium 用のコンポーネント/フック@mapconductor/js-sdk-react/@mapconductor/js-sdk-coreは依存関係として自動的にインストールされます。
useCesiumMapViewState で地図の状態を作り、<CesiumMapView> で描画します。スタイル用の CSS import を忘れずに。外側の要素に高さを与えると全画面になります。
import {
  CesiumDesign,
  CesiumMapView,
  useCesiumMapViewState,
} from '@mapconductor/react-for-cesium';
import '@mapconductor/react-for-cesium/style.css';
import { createGeoPoint, createMapCameraPosition } from '@mapconductor/js-sdk-core';

const TOKYO = createGeoPoint({ latitude: 35.6812, longitude: 139.7671 });
const INITIAL_CAMERA = createMapCameraPosition({ position: TOKYO, zoom: 14 });

export default function App() {
  const mapViewState = useCesiumMapViewState({
    mapDesignType: CesiumDesign.Default,
    cameraPosition: INITIAL_CAMERA,
  });

  return (
    <div style={{ width: '100vw', height: '100vh' }}>
      <CesiumMapView state={mapViewState} />
    </div>
  );
}createMarkerState でマーカーの状態を作り、<Marker> で登録します。オーバーレイは地図コンポーネントの子要素として書きます。
import { useMemo } from 'react';
import { createMarkerState } from '@mapconductor/js-sdk-core';
import { Marker } from '@mapconductor/js-sdk-react';

// ...App の中...
const marker = useMemo(
  () => createMarkerState({ id: 'hello', position: TOKYO }),
  [],
);

// ...return の中...
<CesiumMapView state={mapViewState}>
  <Marker state={marker} />
</CesiumMapView>選択中かどうかを useState で持ち、マーカーの onClick で true にします。選択中のときだけ <InfoBubble> を描画します。これが完成形です。
import { useMemo, useState } from 'react';
import {
  CesiumDesign,
  CesiumMapView,
  useCesiumMapViewState,
} from '@mapconductor/react-for-cesium';
import '@mapconductor/react-for-cesium/style.css';
import {
  createGeoPoint,
  createMapCameraPosition,
  createMarkerState,
} from '@mapconductor/js-sdk-core';
import { InfoBubble, Marker } from '@mapconductor/js-sdk-react';

const TOKYO = createGeoPoint({ latitude: 35.6812, longitude: 139.7671 });
const INITIAL_CAMERA = createMapCameraPosition({ position: TOKYO, zoom: 14 });

export default function App() {
  const mapViewState = useCesiumMapViewState({
    mapDesignType: CesiumDesign.Default,
    cameraPosition: INITIAL_CAMERA,
  });

  const [selected, setSelected] = useState(false);

  const marker = useMemo(
    () => createMarkerState({
      id: 'hello',
      position: TOKYO,
      onClick: () => setSelected(true),
    }),
    [],
  );

  return (
    <div style={{ width: '100vw', height: '100vh' }}>
      <CesiumMapView state={mapViewState} onMapClick={() => setSelected(false)}>
        <Marker state={marker} />
        {selected && (
          <InfoBubble marker={marker}>
            <div style={{ padding: '8px 12px', fontWeight: 600 }}>
              Hello, MapConductor
            </div>
          </InfoBubble>
        )}
      </CesiumMapView>
    </div>
  );
}- 座標・カメラ・マーカーは
js-sdk-coreの関数で作る(プロバイダー非依存) - 地図コンポーネントとフックは
react-for-cesiumから来る(プロバイダー固有) - オーバーレイは地図コンポーネントの子要素として書く
- 表示・非表示は React の
useStateで制御する
@mapconductor/js-sdk-core— ジオメトリ・カメラ・状態のプリミティブ@mapconductor/js-sdk-react— 共有のMarker・Markers・シェイプ・インフォバブル